How to set up and use Sensor Panel Link
Having a small LCD or sensor panel for your gaming setup has been catching on and becoming a trend. With this additional screen, you can achieve both practical functionality and aesthetic appeal, though the installation process can be a bit tricky. In this tutorial, we’ll guide you through the straightforward process of setting up a sensor panel to your GIGABYTE motherboard using the convenient Sensor Panel Link.
What is a Sensor Panel?
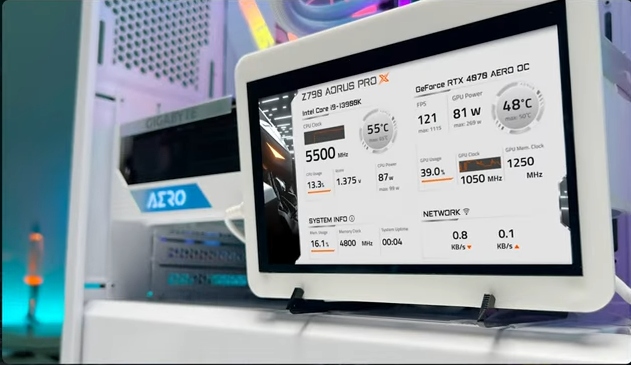
As mentioned earlier, a sensor panel is an extra screen that can be installed inside your PC case, offering a customizable display for system monitoring and other content to enhance the appearance of your gaming rig. With various formats and styles available, you can tailor it to your preferences, making it a versatile addition to your setup.
The Hassle-Free Solution: Sensor Panel Link
Traditionally, connecting a sensor panel involved dealing with cables routing in and out of the PC case, having to connect USB cables to the rear I/O panel and HDMI cables to the graphics card. It could get quite messy. However, GIGABYTE has simplified this process with the Sensor Panel Link feature, available on select motherboards like the sleek white Z790 AORUS PRO X. This feature allows for internal connection, eliminating cable clutter and streamlining the setup process.
Requirements
Before you begin, ensure that you have the following:
-
A GIGABYTE motherboard that supports the Sensor Panel Link
-
A processor with integrated graphics
-
The sensor panel itself
-
Necessary cables for connection
Installation Steps
-
Locate the Sensor Panel Link Port: On your GIGABYTE motherboard, find the Sensor Panel Link position, typically located on the right-hand side of the board.
-
Connect the Cable: Using a USB DP cable, connect one end to the Sensor Panel Link port on the motherboard. Ensure that the cable is routed neatly to avoid obstruction, especially around internal fans.
-
Connect to the Sensor Panel: Connect the other end of the cable to your sensor panel, positioning it neatly inside your PC case according to your preference.
-
System Configuration: After connecting the sensor panel, restart your system and boot into Windows. Your sensor panel should be detected as an additional screen.
-
Adjust Display Settings: Right-click on your desktop and select "Display Settings" to customize the resolution and other preferences of your Sensor Panel. The resolution and refresh rate may vary based on your integrated graphics and the screen you're using.
-
Troubleshooting: If your sensor panel is not displayed, ensure that the integrated graphics are enabled in your system settings.
-
Enhance with Third-Party Software: Consider using third-party software for On-Screen Display (OSD) monitoring to add dynamic effects and further enhance your sensor panel experience. You can even apply the exclusive AORUS Sensor Panel Skin to your sensor panel for a full AORUS makeover.
Check out the tutorial video for a comprehensive, step-by-step guide:
By following these simple steps, you can now get your sensor panel up and running with ease and enjoy the benefits of an integrated display for monitoring system information, while adding visual flair to your setup. Feel free to join us on social media to share your new systems and showcase how the sensor panel elevates your game/work environment. We're excited to see your creations!